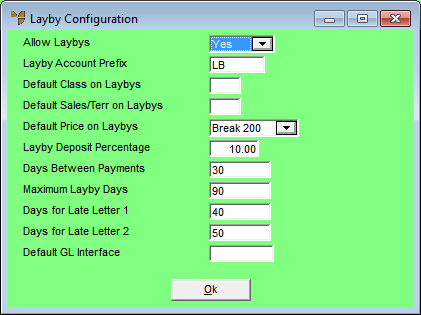
POS is equipped with a standard layby facility. Before your users can start processing laybys, you need to enable laybys and set the layby configuration details using this option.
Refer to "Selecting a Company to Edit".
Micronet displays the Layby Configuration screen.

|
|
Field |
Value |
|
|
Allow Laybys |
Select Yes to enable laybys in POS. |
|
|
Layby Account Prefix |
If you want to distinguish layby accounts from normal debtor accounts in Micronet, enter the account prefix. For example, you might choose to prefix all accounts created at the POS sales counter with a ZZ to distinguish them from normal debtor accounts throughout your Micronet system. This updates your MDS system as a standard debtor record. |
|
|
Default Class on Laybys |
Enter the default debtor class that POS should apply to a new layby account. Leave this field blank for no class. |
|
|
Defaults Sales/Terr on Laybys |
Enter the default sales territory that POS should apply to a new layby account. Leave this field blank for no sales territory. |
|
|
Default Price on Laybys |
Enter the default price break that POS should apply to a new layby account. This is usually set to the normal retail selling price (1-8). |
|
|
Layby Deposit Percentage |
If you want to set a minimum deposit for laybys, enter the percentage. When a layby sale is created, the minimum deposit amount is displayed. This is usually set to 20%. |
|
|
Days Between Payments |
Enter the maximum number of days required between layby payments. This is usually set to 14 days (2 weeks) and assists POS to determine which laybys are running late on payments. |
|
|
Maximum Layby Days |
Enter the maximum number of days that you want to have laybys reserved for. This is usually set to 60 or 90 days. |
|
|
Days for Late Letter 1 |
Enter the number of days after the Days Between Payments that you want POS to send the first reminder letter to customers. This is usually set to 7 days. For example, if a layby has not been paid in 21 days (14 +7) then send letter 1. |
|
|
Days for Late Letter 2 |
Enter the number of days after letter 1 has been sent and where a payment has not been subsequently received, that you want POS to send the second reminder letter to customers. Letter 2 would normally highlight the layby terms and that failure to make payment may result in the layby being cancelled. |
|
|
Default GL Interface |
|
Micronet redisplays the Change Existing Company screen.